Friday, 27 July 2018

1000th post!

Wow. How cool is this?
This is my official 1000th post on my independent blog.

I've been blogging since I first found LHC back in... Summer of 2002 I think? (Before that I was on some Yahoo-groups. Wow. This is a million years ago in internet terms!) So this has been a really long-running habit.
I started blogging here on Blogger back in January 2011, so it has pretty accurately been 7½ years for this blog!

Blogging is perhaps my best tip for those growing or maintaining their hair. It helps you keep track of what products work or doesn't work for you, what updos you can do (Surprising how often an updo just "falls" out of rotation!) and what you would like to try in the future.
It's such a helpful tool. And sometime it can be really funny to look back on your own story.

I think the only reason I managed to keep blogging for so long, is that my blog was always mostly for me. I never blogged to impress or convince anyone, I just blog to keep up with the reasons I mentioned above.
I rarely did anything for or with my hair that I wouldn't have done without the blog, so my blog is a pretty good representative of what it really is to live with long hair: Some times you have time and energy to experiment, and other times you just settle into your usual grove and go through the work-free time-sleep-routine.
(And I never got the points of setting up artsy pictures with freshly cut flowers, philosophy books and pearls lying around in the background. Is that just me?)

So... To another 1000 posts!

Tuesday, 24 July 2018

Caroline von Holnstein


This post will probably end up on the same blog page, so it won´t need introduction. But anyways,  here is the original post on Caroline von Holnstein´s hairdo.

I tried to find something in my closet that was at least pink-ish, but I don´t have any, so I settled for the white shirt as the closest I could get to her clothing.
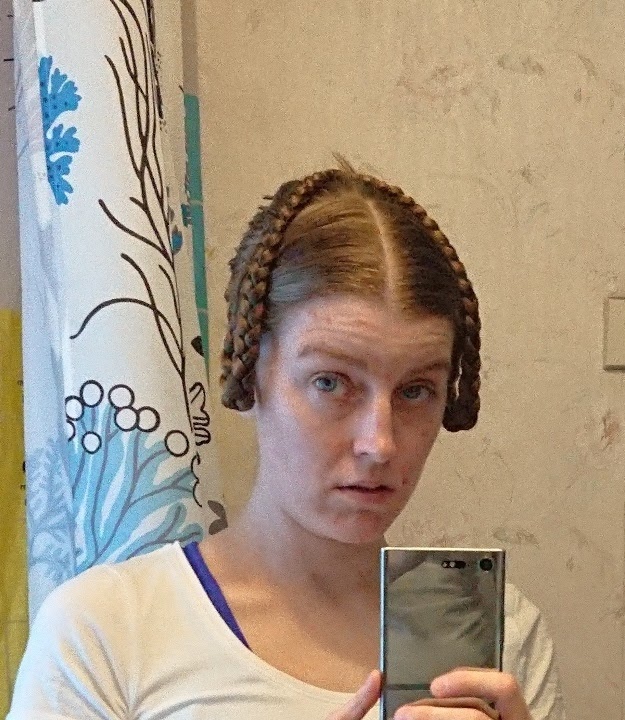

Okay. Not really off to a good start here: I have parted the hair according to what it looks like in the picture, and the two front braids are painfully much thinner than the back. I guess this is why the other blogger who did a style like this took some hair in from the bottom too.

Did she maybe do a five strand braid for the front? A five strand braid will significantly fatten, but flatten a braid. So from the right angle, it will look a lot thicker than a three stranded braid.
Of course there is a strong possibility that the painter made her hair thicker than it was. Only a stupid painter would paint the rich and powerful true to nature, right?

(See historical case of the painting of Anne of Cleves by Hans Holbein the younger supposedly being so far from the truth that king Henry the VIII had very little interest in her once they met in person)

Mr. Igor wants you all to know he called the phenomenon PaintShop. You are all obligated to laugh at his joke. Thank you.


View from the top.
My scalp really hated the center parting. Although my natural parting appears very weak due to just shifting the growth direction a few degrees, there is a lot of strength in the direction of the follicles. It was surprisingly uncomfortable (And unflattering)


Made a bun out of the back braid and pinned it up. Although I started the braid as high up as I felt I could (Sitting in a chair, leaning back and braiding), I guess it wasn´t high up enough. It slid down a lot as soon as I formed the bun. I think a high ponytail start probably isn´t a bad idea for those interested in recreating this better.


I tried to do the “loop” and then pin the front braids up. But the back bun is obviously too far down. It just looks silly, but then again I can´t imagine adding a tall braided bun directly on top of my head would do much to complete the look?

(And holy shit, do I look tired. Time to take a few days off from work maybe?)


Side view isn´t a whole lot better.  It just looks bizarre. This might be cute if I had wrapped the front braids under and around the bun instead of above. Like the pictures from Victoria that Nightgerbil linked to.


One more try to get the back bun up higher: I poke a stick through at the very top, right where the parting is. Really not feeling like having to re-do this thing, so I´ll see what I can do with the base….


The back braid wrapped around the base of the hair stick into a cinnamon bun. This actually looks like the royal bun a bit. But obviously I´m still not getting it up high enough on my head to get the same effect as Caroline’s.


Back view actually looks pretty nice. And again: It looks a lot like the royal bun.


This got a little closer to the original: This time you can actually see the bun from the front, but it´s obviously lacking the height of Caroline´s.

Also this leads me to the observation that I´m having a hard time finding the angle where the front braids doesn´t show up in the right way? In the original, the front braids sort of “disappear” into the updo and doesn´t show their track like mine does. Maybe the front braids are “fed in” in the middle of the back bun instead? Or… PaintShop maybe? (You are all still obligated to laugh at Mr. Igor´s joke. Yes, even when repeated. Thank you)

Saturday, 21 July 2018

1 month with the Neutrogena visibly clear light therapy mask

So, I've had and used the Neutrogena visibly clear light therapy acne mask for a month now. I've already posted some thoughts on it, but here is what I think after a month of use...


First, I think I have to point out that the hack made such a big difference in how much I like this mask. I think I would have absolutely hated this thing and would have been super pissed off at it (And Neutrogena!) if I had been forced to buy a new activator for every 30 x 10 minutes of use.
Knowing myself and my attitude for that kind of shit, I would not have repurchased an activator.


I can't say my skin has improved remarkably from using it. I'm honestly not sure it has made a difference. (But then again, to be fair, you rarely can tell apart a single factors influence on skin from everything else that affects it!)
But, I still think it can't hurt to incorporate it in my routine. So (With the hack) I think this is a mask that is worth spending the money I did. The activator is around one third the price of the mask, so if you couldn't hack it, it would make the total price way higher.

It also feels like this is a "gateway mask". It was easily accessible for me, and it made me curious to try a more expensive and fancier light therapy mask if I should encounter one some time in the future.


After a month of use, I have two major criticisms:

1) The mask could have had way more LED-lights. Especially in the forehead area, where it feels like they cheapened out by only having a single row of lights when there were obviously room for two. The lights are packed way denser around the mouth, but could also have used a row higher up to better "cover" the upper cheeks and nose area.

2) The blue light, which combats bacteria, seems to run out of power/lose intensity (?) when in use. Luckily I'm mostly interested in the inflammation-dampening red light, but still!
The picture below shows how it has "faded" more than the red after having left it on for a while.


In conclusion: I think I recommend this mask. It's cheap (If you hack the activator), easily accessible (I got mine at lookfantastic, but I have seen it other places too), probably has some effect (Definetely haven't hurt my skin, but it might give a different result for someone with actual acne issues) and will easily give you an idea if a light therapy mask would be something for you or not.

Thursday, 19 July 2018

The hatpin peril

While working my Google-Fu trying to find information on Caroline von Holnstein, I ran into this:


Articles about Edwardian women defending themselves against harassers using their elegant hatpins (And the lawmakers who panicked and starting outlawing long hatpins)

I remember that hairsticks for self defense have been discussed on LHC many times. And to be honest, some of the ones I have could do some serious damage...

Anyways. This was a fun, frustrating and enlightening read, so here are some links:
The hatpin peril
The sting of a hornet
The hatpin as a lady's weapon of choice
Call the fashion police! I'm wearing an illegal hatpin!

Monday, 16 July 2018

Dragon braid II

My first attempt at making a dragon braid left me with an idea: What if I created the little "ponytails" first and then did the "braid" second?
I got the same coworker to play model for me again and give it a try. 
And this time I was actually happy with it. 
I feel this time, the separations got neat and clean to highlight the structure. Nothing slipped for me so it was a lot easier to create too! And I got a lot more stability in the structure to really get some volume into the "braid" part too.


I do however think she will absolutely hate me once she has to take 50 or so tiny little silicone elastics out of her hair... aheum... 

Friday, 13 July 2018

Caroline von Holnstein

Some time ago, Nightgerbil pointed out how much I look like this lady: Caroline von Holnstein.
I have to admit the resemblance is really strong. Especially in some of the pictures/scans where the haircolour is really close to mine. That sort of not-really-blonde, not-really-brunette kind of colour. The resemblance in some of the reproductions though... Not so much. 

The original painting is from the Gallery of beauties and she was 19 years old (And had been married for 3 years, had two children and lost both already) when the painting was made.
Her wikipedia page is pretty short and to the point, but I guess at that time, her story was quite extraordinary, because she did things that noblewomen just didn't. 


I have been trying to find a tutorial for her hairstyle, but with no luck. Since the painting is from 1834, it puts it right at the end of the time period you could consider regency. Her updo does remind me of the typical regency hairstyles, but instead of the front pieces being short and curled, hers are braided. It appears to be parted in the same place and shape as the regency updos. Also most regency updos seems to carry the "back bun" a lot lower. Most regency styles seems to have some sort of decoration, but this is in the end of that period, so the style could be changing...


Here's a Torin tutorial for a more classic Regency updo.

I did find one tutorial where Caroline's hairstyle is referenced, but here they say the finished updo was "inspired by" her style (In Swedish. Not sure how helpfull Google translate will be for those who don't speak Swedish). I think what they did at the neck probably is inaccurate when you look at the thickness of the braids? It looks like the back braid should be proportionally thicker than the front parts, at least in the original painting.


I think it's easier to see what was done on the reproduction of the original painting. 
The hair is split into two front pieces and one back. The two front pieces (green and yellow) and braided straight down, then looped forward and back to meet with the back braid. 
Now, what was done with the back piece I can't really tell. My best guess is a simple braid started off really high, then turned into a bun holding the two front braids down. The original painting and the reproduction both do have some thinner braids at the base of the bun, which might be coming from the front pieces?

In the reproduction, the bun is a lot flatter where the original painting has a bun that is taller than it is wide. The original bun could probably be recreated by making a Nautilus, and then wrapping the braids from the front pieces around the bun. The reproduction would probably be more accurate if you did a regular cinnamon bun with the braid.

I'm going to look around a little more, but since I've had no luck finding an accurate tutorial so far, I doubt I will be lucky...

Wednesday, 11 July 2018

The axe in action

The AKCwoodworking axe stick was one of my favorites when I received it, but in action it seems that the "blade" part drowns somewhat in my bun?

Sunday, 8 July 2018

Dragon braid

I was poking around youtube to look for tips on the rope braid so I can do it on my own hair, when a tutorial name caught my eye: Dragon braid. 
It just sounded so cool, I had to check it out.
It turns out, it really isn't a braid though? I guess only in the loosest possible meaning.
The result does look really cool, but I don't think it would be something I would actually want to try on myself. It looks like the "braid" will lack some stability, and I don't like the idea of having so many little elastics so close to my scalp.

This tutorial here was the best and easiest understood I found:


So again, I talked a coworker into letting me try on her hair.

Good thing
Coworker absolutely loved it. She has rather thin hair and really loved the "fattening" effect it had on her braid. She said she felt really cool with it in.

Bad thing
I'm not so impressed. I mean, it does look pretty cool. 
But, I don't think you could tell this apart from a regular old Dutch braid from a distance. And it took a lot longer to create than a Dutch braid. Even with some more experience and training in making this, this "braid" would still be very time consuming to make. 
Also I felt like I struggled quite a bit to keep all the parts separated when I fed in new parts. I think it really shows too: The separations should be way sharper and cleaner. 
And personally would have to redo it so I could actually sleep on it. 
So...Not impressed. 

Thursday, 5 July 2018

Throwback Thursday


*Giggle* Would you look at that first attempt of a crown wrap? So funny that my hair was too short to reach all the way around my head!


Now it can go a couple of times around...


Tuesday, 3 July 2018

Today's hair

The paranda actually helps to "fill out" the bottom bun and bring them closer in size. This might be worth remembering in the future...
However, I should probably have reversed the updo order. The loose hairs (Especially the short pieces around my temples) just look so much cuter with the royal bun.